Dashboard & Overviews (6)
Cargo Cube offers a wide range of reporting options as follows:
Customized reporting
Based on the reporting tool Qlik Sense we offer customers a completly customized online report. Together with our customers we define relevant KPIs which can be set based on all data available to Cargo Cube. The target is to achieve best possible insights and create highest possible business value. The report can be opened direclty via the Cargo Cube landing page.
Standard Report
We offer customers who are interested in standard KPI´s related to ocean shipping the standard report option. Here we place this pre-defined report in excel form on the starting page. The report is updated once a month.
KPI Widgets
The newest function in that context are our KPI widgets. These can be activated in the user settings and show diagrams covering volume, on-time performance and runtime deviation.
Cargo Cube Standard Reporting and KPI widgets are activated by default for all customers. For customized Qlik Sense Reports please get in touch with our Support Team using info@cargo-cube.com
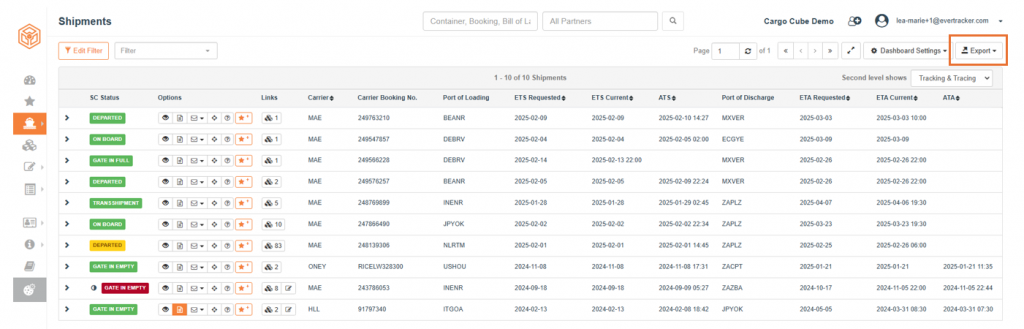
Yes, you can export the exact contents of your overview pages as Microsoft Excel file (XLSX). The export also includes the verbal and light status of shipments. To create the file, click “Export” drop down menu button on the top right of your overview table.
In the next dialog, you can select, if you want to export the table or your traxkings via XLSX.
Cargo Cube offers three different filter options to get a quick overview of specific issues:
- Quick Search
- Filter Module
- Filter Widgets
- Quick Search
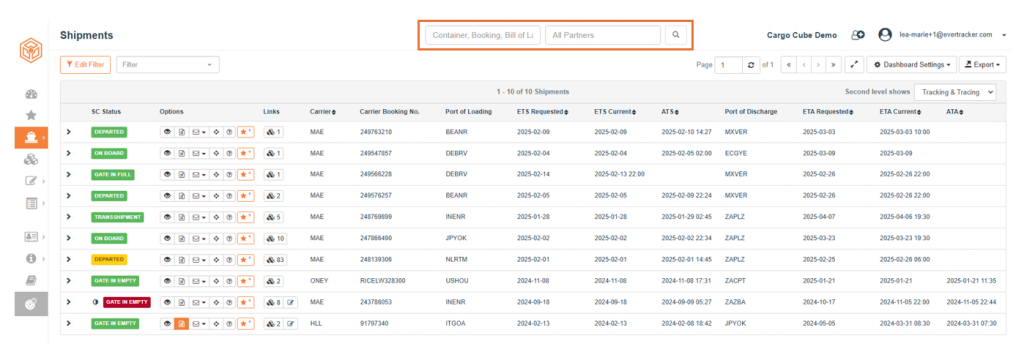
The easiest way to filter overview pages is via quick search. The corresponding input fields can be found in the middle of the header area and allow you to enter references, partners, etc.
- Filter Module on Overview Pages
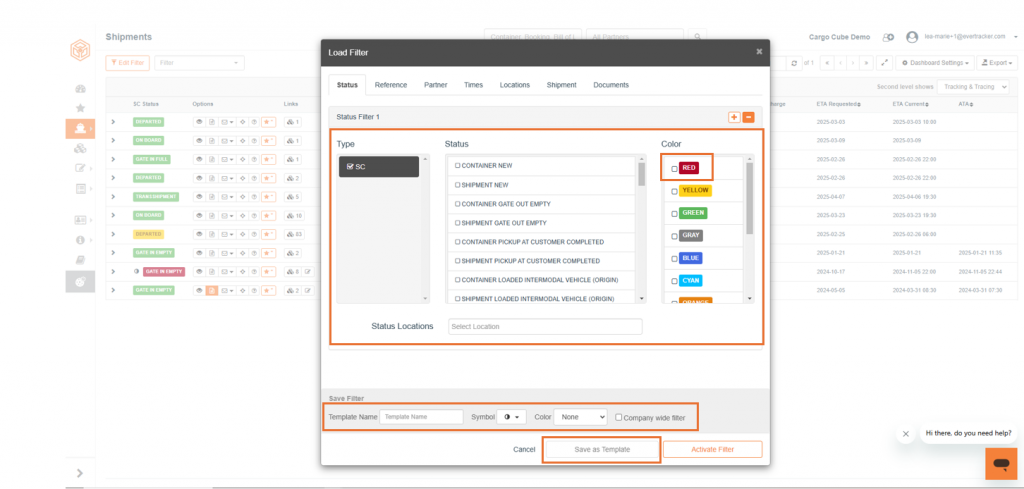
At the top of all overview pages, a filter function is available. This enables the filtering of specific scenarios, that can also be saved as a filter template. The templates are provided within the dropdown menu on the top right area.

Clicking on the button “Filter” opens the settings level. The required scenarios can be set there, for example filtering for shipments with red SC status. There, the filter can also be customized in terms of naming, colors and icons. Clicking on the button “Save as Template” makes the filter available in the template dropdown menu mentioned above.
- Filter Widgets: Quick Access to Filtered Scenarios
The creation of so-called filter widgets on the dashboard enables quick access to filtered overview pages.

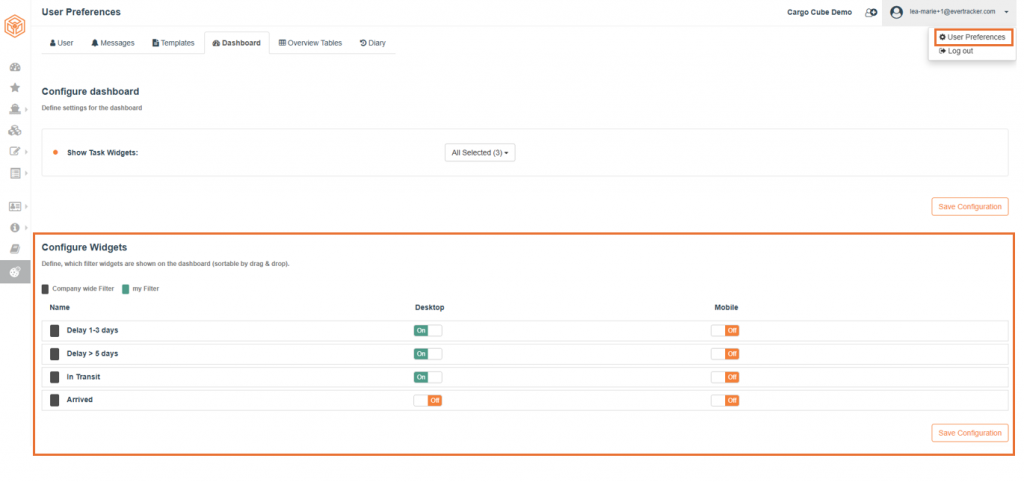
The basis for this is a set of filter templates that are created using the filter module from point 2. In addition to the filter dropdown, these templates are also available within the user settings under “Dashboard” tab / Configure Widget. Filter widgets can be activated and deactivated for both, the web frontend and the Cargo Cube Mobile App. The entries can be moved via drag and drop to change the widget order on the dashboard.
Yes, our overview pages include an archive. Archived shipments are all shipments that have exceeded a defined time period after arrival. This filtering can be carried out via “Dashboard Settings” drop-down menu on the right-hand side above the table. The overview page is filtered by ticking the “Show archived only” checkbox.
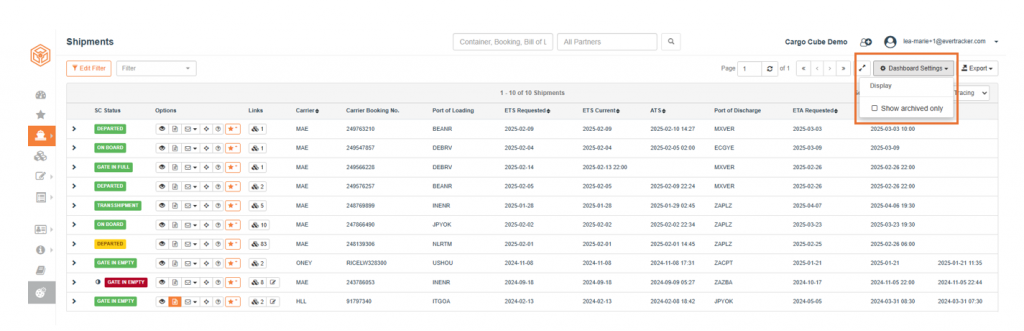
Archived shipments can be recognized by the yellow background. Same archive functionality is also available for containers and other transactions, such as shipping requests.

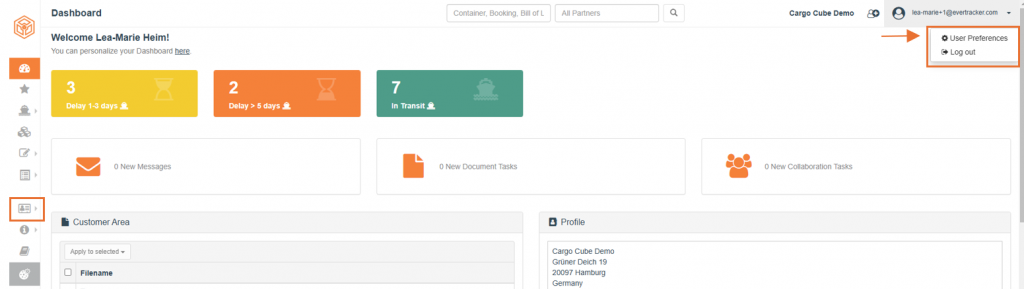
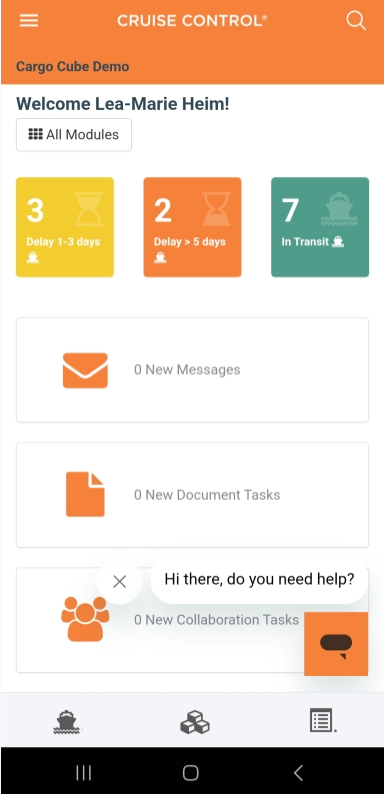
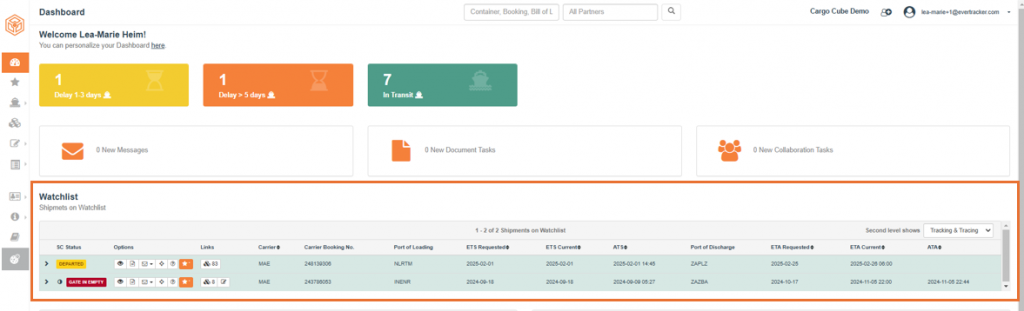
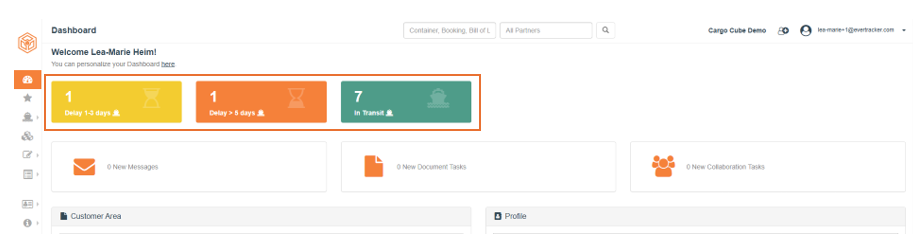
After logging in, you will be taken to your homepage, the dashboard. There you can get a quick overview of your topics and navigate to the Cargo Cube pages and core functionalities. You can configure your dashboard to suit your needs in the user settings within the “Dashboard” tab.
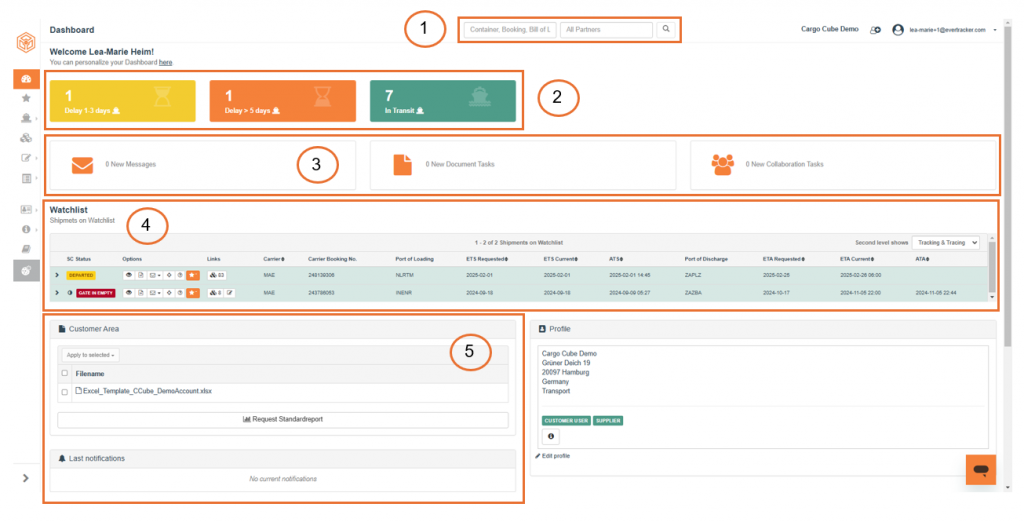
The dashboard is divided into the following areas:
- Quick Search
This function enables a quick search, for example for specific references, shipments, containers, partners, etc. You can find the input fields in the middle of the dashboad header area.
- Filter Widgets
Filter Widgets allow quick access to important sections within the supply chain. You can individually set up and configure widgets based on filter templates.
- Tasks
Tasks provide an overview of new messages and documents to be processed. Quick access to the task overview page is provided by clicking on the corresponding buttons.
- Watch List
All shipments that you have placed on the watchlist are displayed in this area.
- Customer Area & Last Notifications
In this section you will find the latest documents and notifications.
Cargo Cube offers following overview pages:
1. Shipment Overview – see all relevant information regarding your shipment.
2. Container Overview – sublevel of the shipment overview. Gives detailed information about an individual container.
3. Stockitem and Stockmovement Overview – provides an overview about inventory levels and the respective movements to and from a warehouse (this function can only be applied if the FMS WMS is used).
4. Order Overview – gives an overview about the status of individual orders. This is related to our order management function.
5. Transport Order Overview – related to the shipment overview. Gives a detailed breakdown about pre- and on-Carriage transports, as well as pure overland moves.
6. Shipping Request Overview – gives an overview about all placed bookings. (Pre-shipment stage)
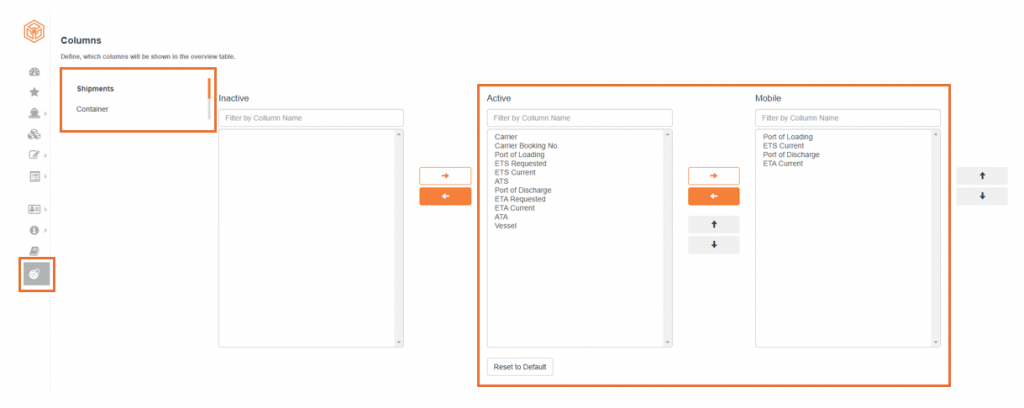
All overview pages can be adapted to customer needs. For example, these column customizations can be implemented:
- Number & type: What columns should be available on what overviews? (selection of available columns from a pool)
- Sequence: In which order shall the columns be displayed?
- Wording: How should the column headings be named?
Partner Collaboration (5)
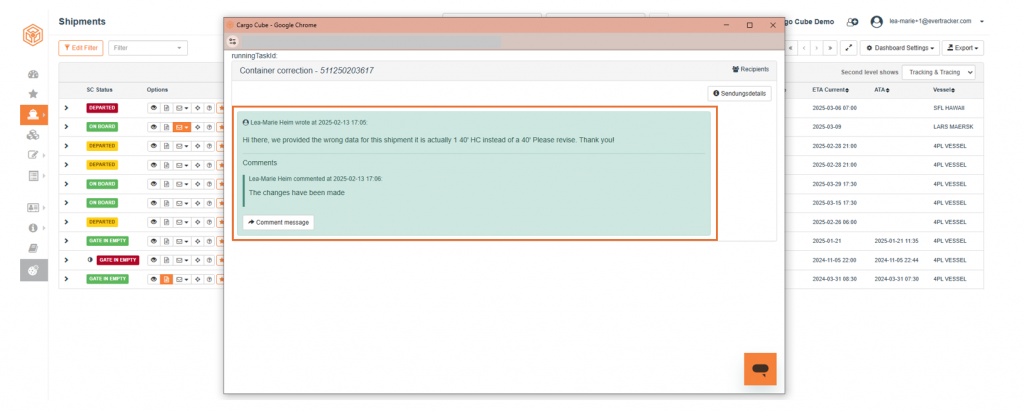
You have a transport related question or want to provide your partners with transport information? For this purpose, you can use our messaging feature. All involved parties with dashboard access have the option of sending a transaction-related message, for example relating to a specific shipment, container etc. The dialog opens by clicking on the “Messages” button (letter icon) within the options area on the overview pages. A colored button indicates that there is a message for this transaction.
Within the dialog, you can write your message. You can also enter a title and select recipients there. Using the button „Add Listener“, you can involve additional e-mail addresses to keep external users informed.
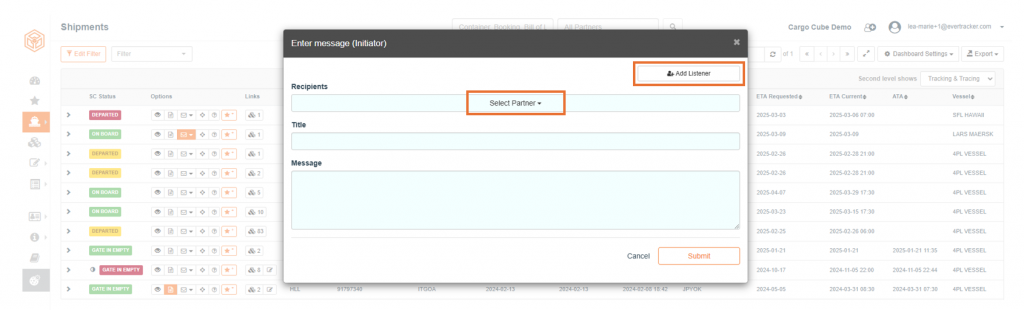
If you want to view the entire dialog for a transaction, you can select “Show all messages” option, using the message button.
In order to professionaly conduct import bookings we use an integrated booking workflow which enables structured communication between the destination office and the respective origin office or agent. All recurring steps of the booking communication are done via workflow task. The data exchanged within the process is saved in a structured way and fed into the shipment in our ERP system. The typical steps within the workflow are:
- Supplier contact
- Agent provides booking options
- Forwarder confirms or refuses booking options
- Agent places booking with the carrier
- Agent confirms booking according to the prior negotiation
Document Exchange
All participants on Cargo Cube can exchange documents with each other. Documents provided of and for different user groups are originated in our central document server. Documents provided by different user groups are uploaded on Cargo Cube and transferred to our central document server.
You can access the upload dialog by clicking on the “Document” button in the options column of your shipment.
You will also find an upload functionality within your shipment details, using the tab “Documents”.
Document Correction
Cargo Cube offers a document correction process based on an embedded PDF editor. Classically this function is used between your freight forwarder and customers to correct BL drafts.
Cargo Cube can be accessed by all participants represented within the supply chain. These parties can interact in different ways with each other or provide information on the platform. Parties that can access the platform are:
- Supplier – provides status on production orders
- Agent – interacts with your providers regarding import bookings
- Buyer (Customer´s customer) – can view their shipments
- Customs broker – provides customs related status updates
- Trucker – provides trucking related status updates
- Warehouse provider – upload warehouse transaction data
As soon as a message is sent within the platform, Cargo Cube starts a workflow task. That means: The recipient gets a message as a task to be processed. All message tasks are shown in the “Messages” tab table within “My Tasks” overview page. You can enter there via “Tasks” entry in the main menu.

A message can be edited by clicking on the ” column entry “Type”. Before editing, the user must assign the task.
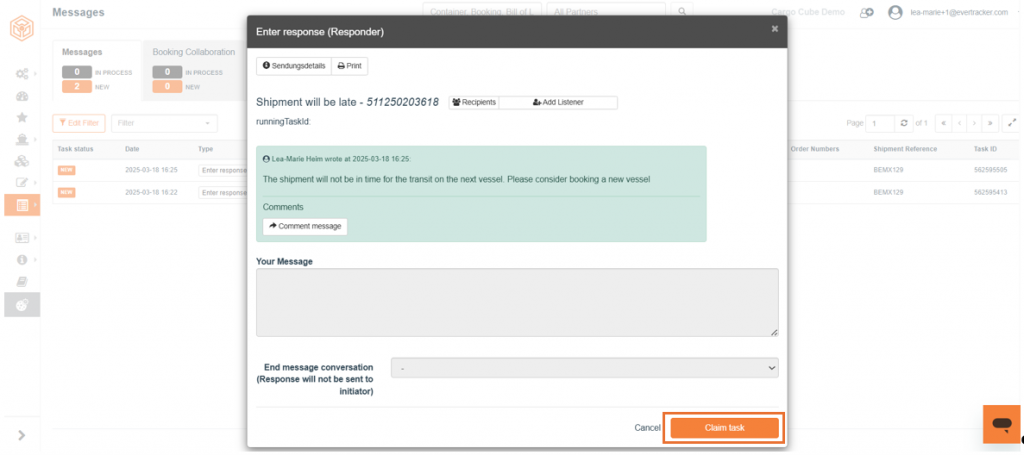
After final processing, the message disappears from the list of message tasks.
Tracking & Tracing (5)
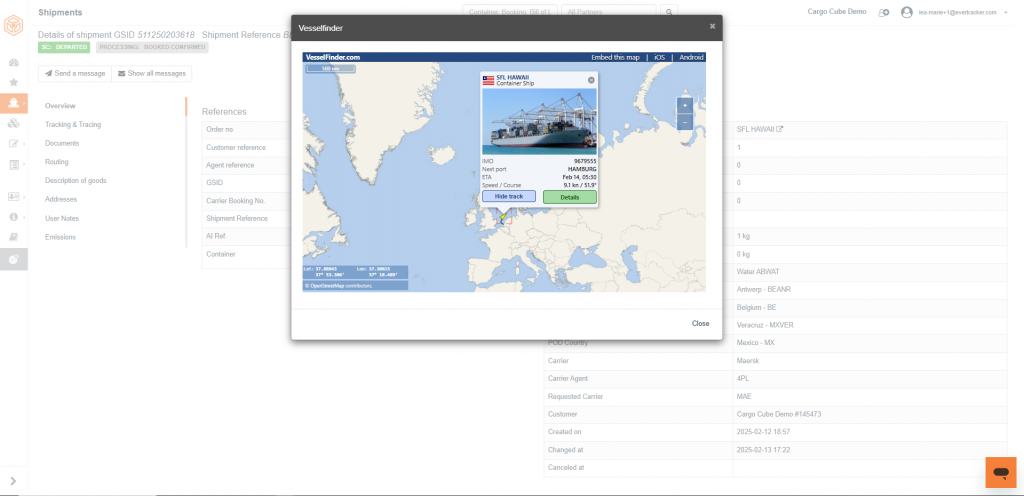
Yes, you can track specific vessels using the Cargo Cube vessel tracker. You find this feature in the shipment overview table clicking the column entry „Vessel“.
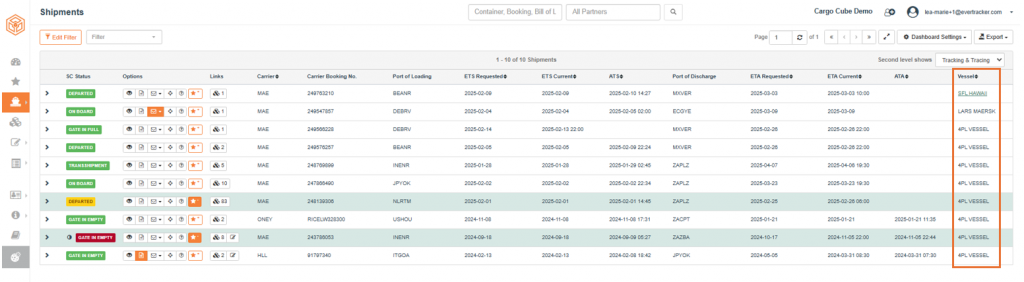
You can further navigate there via overview tab within the shipment details.
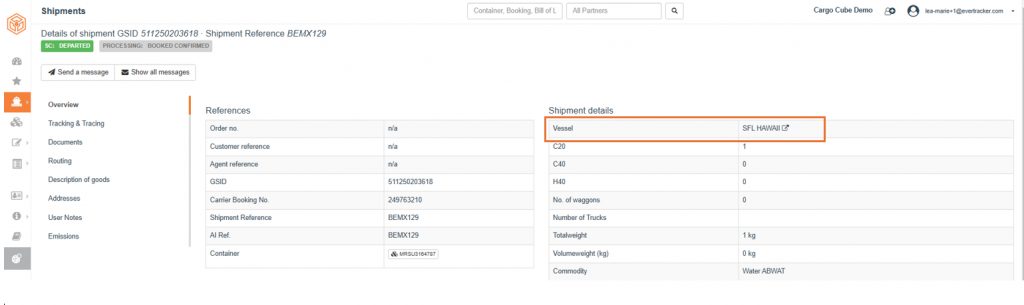
In case, vessel information is available, the ship name is provided with a link. Clicking on the link opens a new window, that shows a map including information such as current vessel position, speed, next port etc.
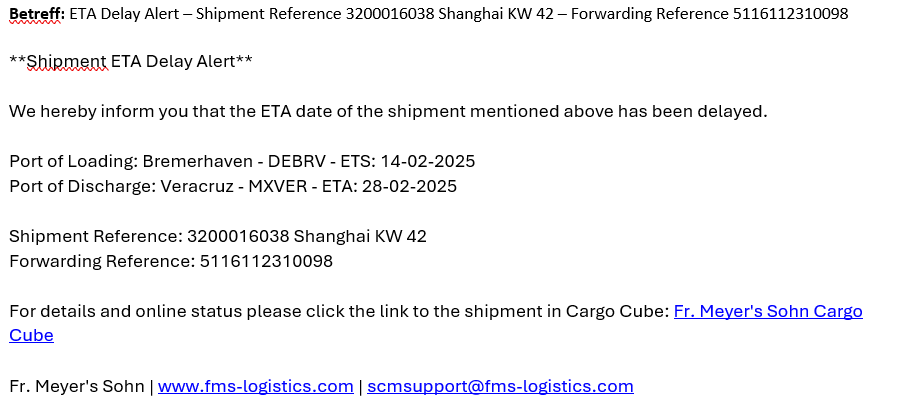
You don’t want to log in to Cargo Cube, but want to keep track of delays? Then, alert mails are an option in order to be informed about delays at the port of loading (POL) or port of discharge (POD). The advantage of alert mails is that the customer can determine its own deviations after which a shipment is deemed delayed. For example, the customer could wish to receive an alert mail from a deviation of plus 3 days at the POD. Each alert mail contains a customer reference, a link to the Cargo Cube Portal and it can be sent to various e-mail recipients. How this works is explained in the following section:
Shipment milestones of different qualities are used in order to calculate deviations at POL or POD. Usually, the milestones ETS Confirmed (POL) and ETA Confirmed (POD), which reflect confirmed milestones towards the Cargo Cube customer, are used as baselines. The baselines are then compared to milestones ETS Current (POL) and ETA Current (POD), which contain dynamic information and adapt to the carrier’s delay tracking. If the calculated deviation then reaches or exceeds customer´s defined number of days, delay alert mails are triggered automatically. To set up alert mails for your customer(s), please contact the Customer Solutions Team.
Our target is to provide the best possible track and trace data quality. The data we show on Cargo Cube is automatically received via direct interfaces with all leading carriers and beyond. In addition to the pure tracking and tracing events we also frequentely receive ETA updates while the ship is on sea. Classically a tracking and tracing history on a shipment comprises of the following events:
- Gate Out Empty
- Gate In Full
- Loaded
- Departed
- Arrived
- Discharged
- Gate Out Full
- Gate In Full
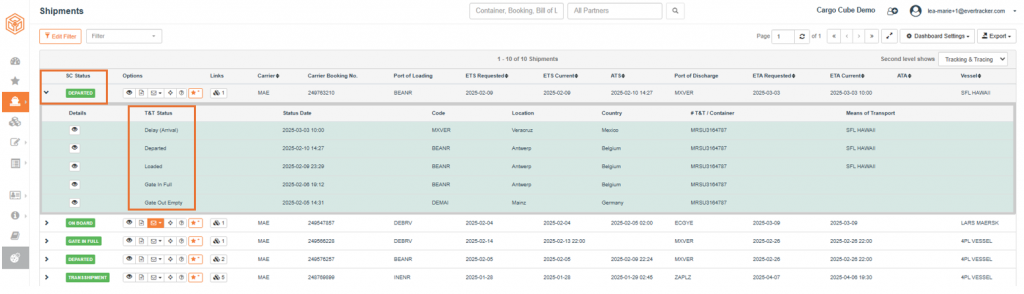
The SC status (Supply Chain Status) on Cargo Cube provides information about the current transport stage of your goods within the supply chain. It is set for the shipment and each container of the shipment. This is done by transforming the trackings received from carriers into our SC status scheme. The SC status flow has clearly defined sequences and consist of two main elements: the verbal status and a color status.
The color status indicates the punctuality by calculating deviations. Yellow means too early, green on time and red on delay. These colors can be customized. The same applies for deviations: Customers can define deviations. E.g. a deviation of +4 days at POD is red. Generally, the milestone quality “Confirmed” is used as baseline for the calculation of deviations. Other milestone qualities such as “Requested” can be used as well.
The Status Flow can be subdivided into:
Pre-Carriage (Stage from Shipper to Port of Loading)
| SC Status (Supply Chain Status) | Definition |
| NEW | Initial Status (No Movements so far) |
| GATE OUT EMPTY | Empty Container picked up at Depot (Origin) |
| LOADED INTERMODAL VEHICLE PRE | Shipment/Container has been loaded on Intermodal Vehicle (Origin) |
| ARRIVAL INTERMODAL DESTINATION PRE | Shipment/Container has arrived on Intermodal Destination (Origin) |
| GATE IN FULL | Full Container returned to Terminal (POL) |
Main-Carriage (Stage from Port of Loading to Port of Discharge)
| SC Status (Supply Chain Status) | Definition |
| LOADED | Shipment/Container loaded on the vessel (POL) |
| DEPARTED | Vessel departed (POL) |
| TRANSSHIPMENT | Shipment/Container discharged from vessel (≠ POD) |
| ON BOARD | Shipment/Container loaded on the vessel (≠ POL) |
| ARRIVED | Vessel arrived (POD) |
| DISCHARGED | Shipment/Container discharged from vessel (POD) |
On-Carriage (Stage from Port of Discharge to Consignee)
| SC Status (Supply Chain Status) | Definition |
| GATE OUT FULL | Container picked up at the Terminal (POD) |
| LOADED INTERMODAL VEHICLE | Shipment/Container has been loaded on Intermodal Vehicle (Destination) |
| ARRIVAL INTERMODAL DESTINATION | Shipment/Container has arrived on Intermodal Destination (Destination) |
| DELIVERED TO CONSIGNEE | Shipment/Container has been delivered to Place of Delivery |
| GATE IN EMPTY | Empty Container returned to Depot (Destination) |
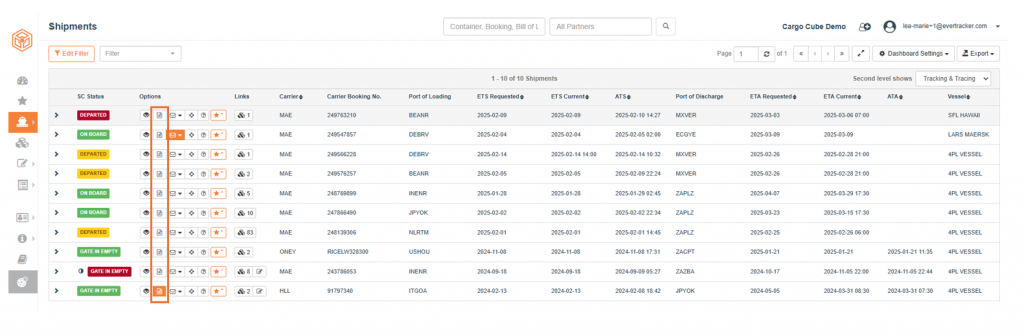
You can track you shipments in the corresponding overview page. To navigate there, use the link in your main menu. Within the overview table, you can see shipment information such as supply chain status, addresses, references, ports, departure and arrival times etc.
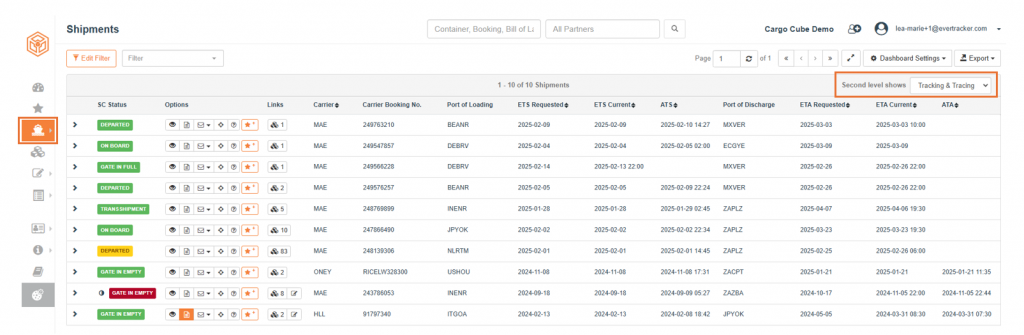
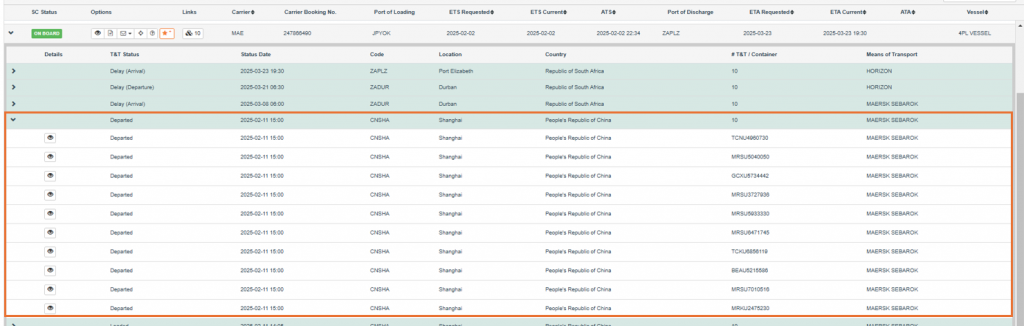
To get a complete status overview in an chronological order, select “Second level shows Tracking & Tracing“ by using the dropdown menu on the top right of the overview table. Clicking the arrow navigation “>” on the left end of a shipment, you can fold out a second second level view (green background), that shows infomations like T&T status, status date, UN Locode etc.
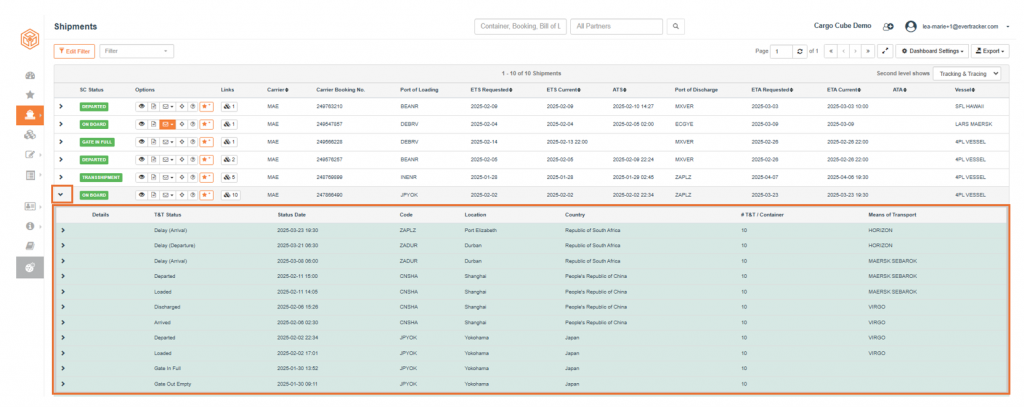
Clicking again on „>“ navigation, you can fold out a third level view showing status information for specific containers.
User Profile (4)
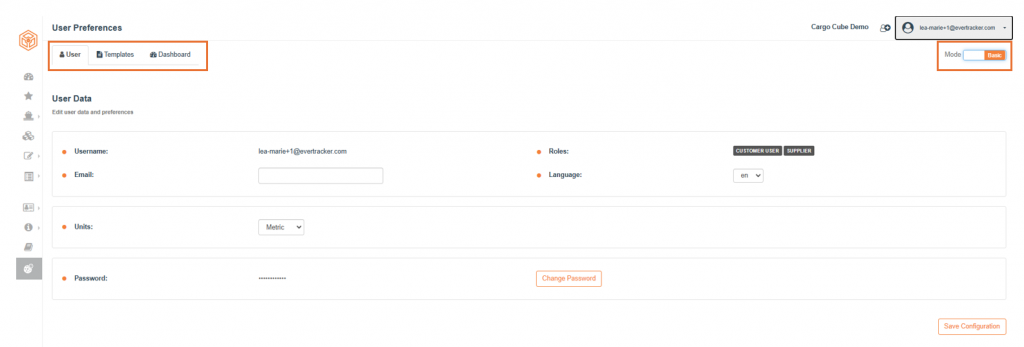
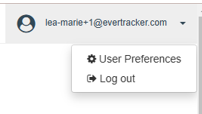
You can customize your account in your user settings. They are located in a drop-down menu within your user profile. It can be accessed by clicking on the profile icon. Another link is provided by the file icon in the main menu.
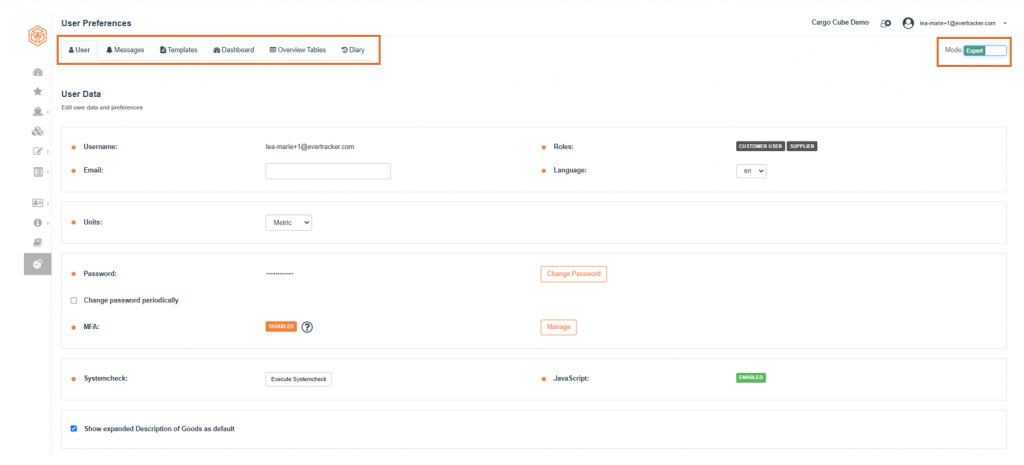
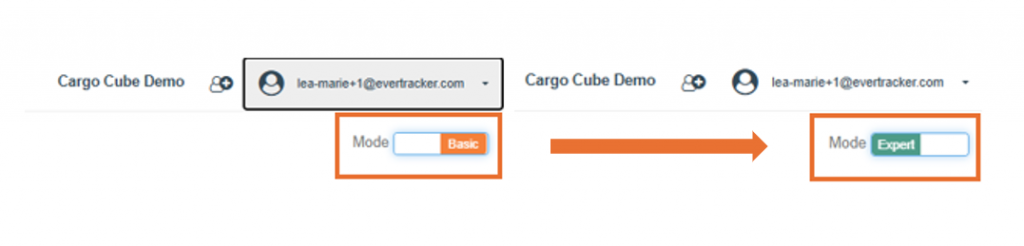
Inside your user settings, various configurations and profile information can be managed. You can select the scope of setting options using a switch between Basic and Expert Mode at the top right of the user settings.
Basic Mode
Within Basic Mode you will find three areas where you can make your personal settings:
- User: Here you can choose your language, edit your profile email address or choose the units of your overview pages.
- Templates: In this area you can manage your filter templates that you have saved for your dashboards.
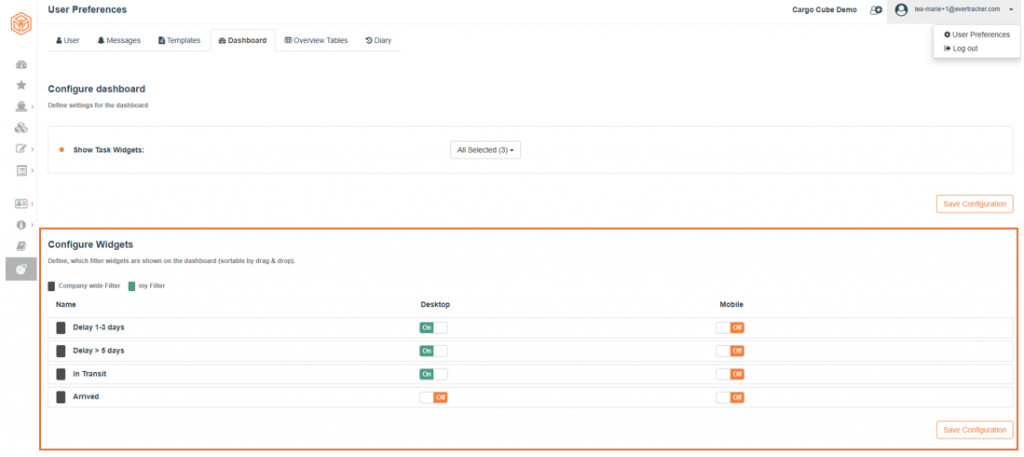
- Dashboard: Here you can set your dashboard elements. These can be filters and KPI widgets as well as shipment diary elements.
Expert Mode
The Expert mode offers further options for making individual user settings. In addition to the configurations of the basic mode, these are:
- Messages: Here you can set which messages you receive and at what frequency.
- Overview Tables: In this area, you can make various settings for your overview tables: The number of entries, the columns displayed, the sorting and the information to be displayed on the second level.
- Diary: Here you can set in detail which elements your diary should contain on the dashboard.
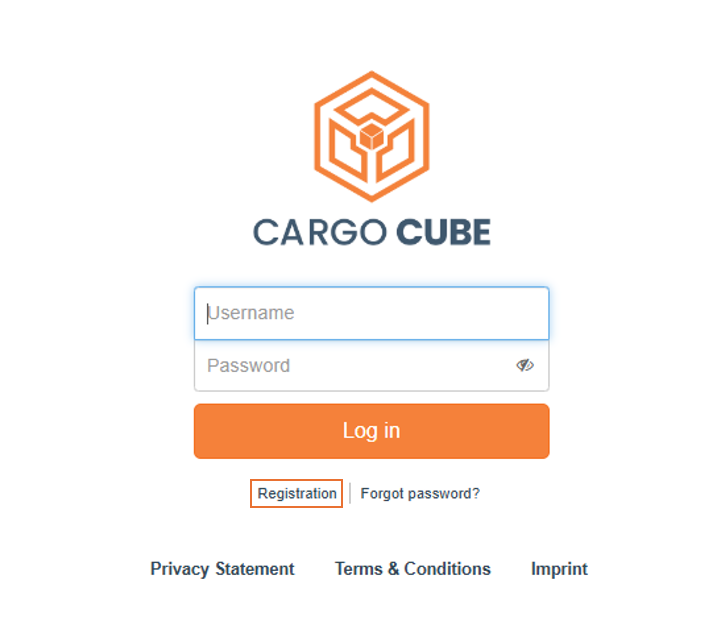
If you do want to set up a new user and create a new company profile, navigate to our webpage at https://www.cargo-cube.com/scm/login.html?context=cargocube and click on the “Registration” button. Proceed to complete the required fields with your personal information.
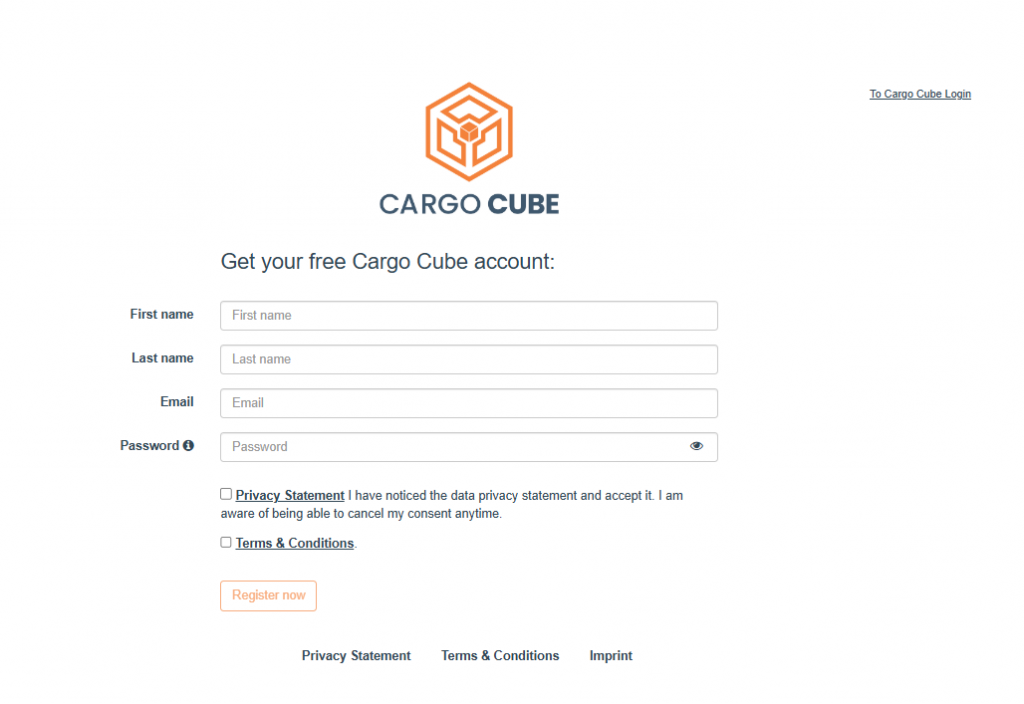
Upon submission of your personal information by clicking “Register now”, an email will be sent to the provided address for the purpose of email address verification. Confirm your email address by following the instructions in the email. Upon successful verification, you will gain access to Cargo Cube.
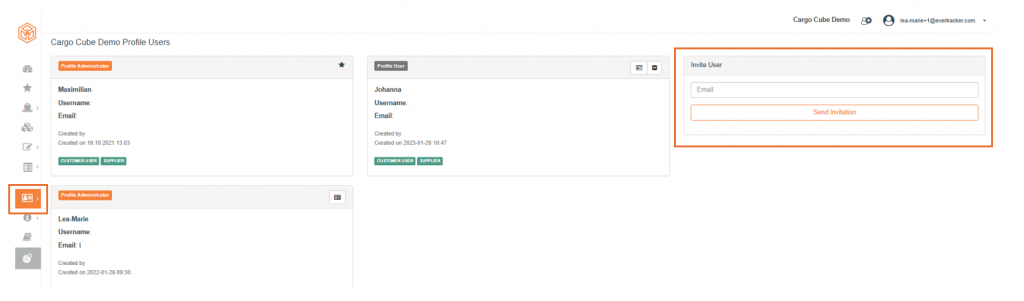
In addition, users can invite their colleagues to the company profile by locating the plus-icon in the upper right-hand corner of the “Dashboard”. By clicking this icon, you get redirected to the “User Management”. To invite a user, enter their email address in the designated “Invite user” box in the upper right-hand corner and hit the “send” button.

You forgot your credentials and you are wondering what to do now? Depending on your specific problem you have the following options:
- If you only forgot your password, you can click on “Forgot password?” under the log-in button. An email will be triggered, that takes you to a dialog where you can create a new password.

- If you can not remember your username and password, your credentials need to be resend. For this, please contact our Customer Solutions Support via customersolutions@fms-logistics.com.
Are you wondering how to activate your MFA (multi-factor authentication)? Before you can start the activation process, you need to download “Oracle Mobile Authenticator” app (free version) on your mobile device. The app is available in Apple App Store as well as in Google Play Store. The icons below provide respective download links:
Download for iOS:

Download for Android:

After you have successfully installed the app, you must perform the following steps in Cargo Cube:
- Log-in to Cargo Cube, go to User Preferences. You can find these in the upper area on the right by clicking on the dropdown next to your user name.
- If you are in “Basic Mode”, move the slider in the upper right area to “Expert Mode”.
- Go to password section within “User” tab. Click on “Manage” to activate MFA.
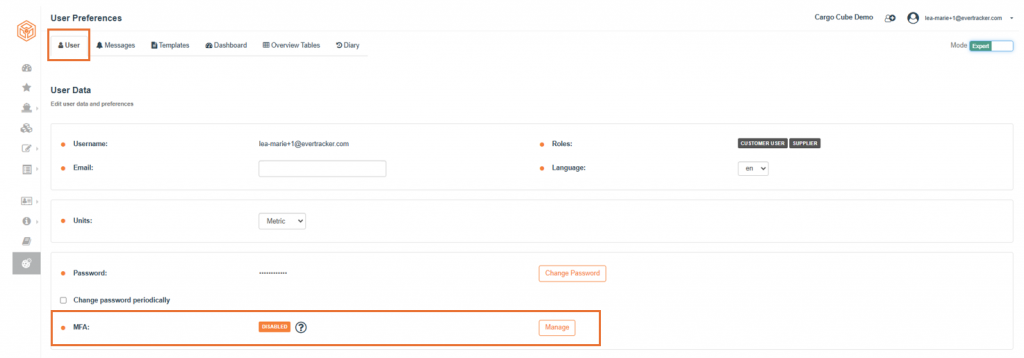
- Clicking on “Manage” button, an explaining text information comes up. Click on “Enable MFA” to start the process.
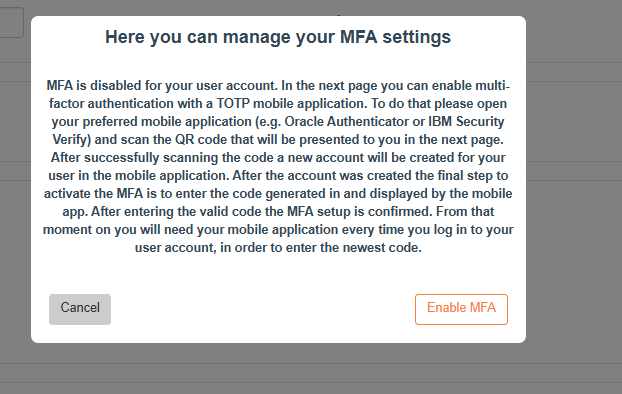
- In the next step, you will see a barcode. Scan the code via authentication app and enter the numerical code you receive within the app. Click “Done”.

- Now, MFA is activated for your user. From this point on, you must authorize each login process with a six-digit numeric code.

Mobile App (3)
Yes, you can also use your filter widgets within the Cargo Cube Mobile App. They are activated on the mobile dashboard in the same way as the widgets in the web frontend.
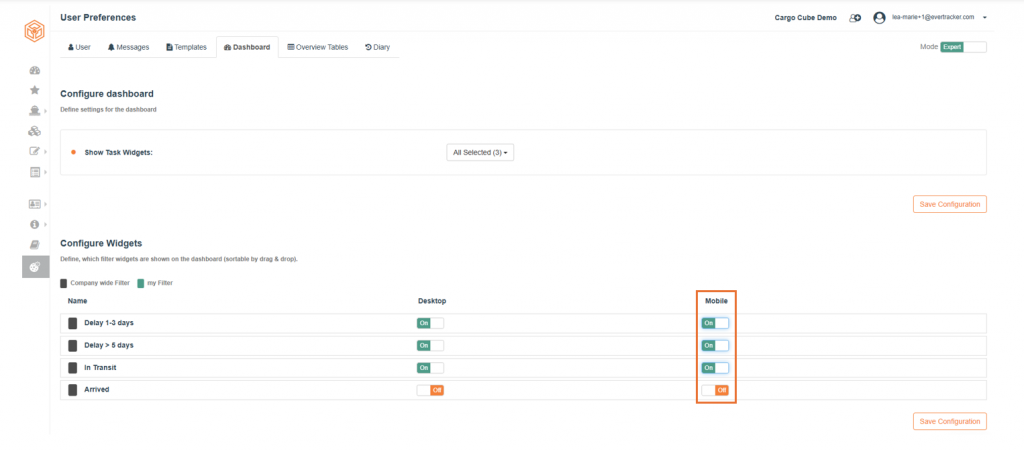
You can create and save templates via filter module. All available filter templates can be activated as a mobile widget. To do this, go to “Dashboard” tab within the user settings. In the “Configure Widget” area, you can activate your filters within the “Mobile” section. Save your settings and switch to your mobile app.
For the new configuration to take effect in the app, you must log off once and then log in again. After this step, the widgets are available on the mobile dashboard.
As with the web application, you can also structure your mobile overview entries according to your needs.
You can make these adjustments with just a few clicks in the user settings of your web application:
1. Go to the user settings of your desktop application.
2. Activate „Expert Mode“.
3. Navigate to “Overview Tables” tab, go to „Columns“ area.
4. Select the target of your customizations in the menu on the left: shipment or container overview page.
5. Within the “Active” window, you will find all available columns, your “Mobile” window shows the active default column set of your mobile app.
6. Click on the required column in the “Active” window and move it to „Mobile“ window using the blue arrow button.
7. Click on the relevant column in the “Mobile” window if you want to remove a column. Use the red arrow button to remove it from the active mobile set.
8. By clicking on an active column and using the gray up / down arrows, you can vary the position of the column within your mobile overview entry.
9. Click on „Save“ button to activate your customizations.
10. Switch to your Cargo Cube Mobile App. Log off once and log in again. Your selected column set is now active.
The Cargo Cube Mobile App supports iOS and Android and is available to download free of charge from the AppStore and GooglePlay Store. To be able to use the Cruise Control app, your device must be compatible.
iOS compatibility:
If you use the app with your Iphone you need iOS 13.0 or newer.
If you use the app with your Ipad you need iOS 13.0 or newer.
If you use the app with your Mac, you need macOS 11.0 (or newer) and a Mac with Apple M1 chip (or newer).
Android compatibility:
If you use the app with an Android operating system, you need Android version 6.0 or higher.
Download the Cruise Control Mobile App on iOS or Android now:
Filters & Templates (3)
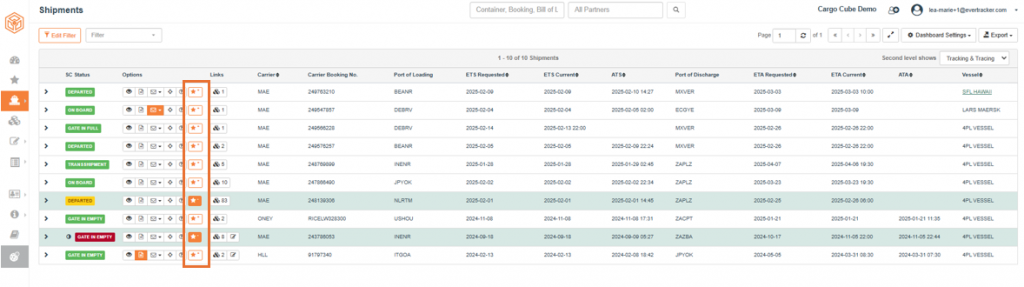
Would you like to keep an eye on certain shipments and monitor their progress? You can use our watchlist functionality for this purpose. All shipments on your watchlist are displayed in a list view on the dashboard.
Proceed as follows to add a shipment to the watchlist:
- Go to shipment overview page.
- Select one or more shipments you would like to add to the watchlist.
- Click on the orange star icon in the options column.
- The star icon changes its background color to orange. The shipment is now available on the watchlist.
- If you want to remove one or more shipments from the watchlist, click again on the star icon. As soon as the background color changes back to white, the shipment is no longer available on the watchlist.
The filter module allows you to filter your overview pages according to specific attributes. Select available filters from the filter dropdown and click “Activate Filter”. You can set up filters for various scenarios and criteria, for example supply chain status, references, partners, locations, etc. You can also activate your filter templates as quick filters, so-called filter widgets, on your dashboard. The filter functionality is located in the header area of each overview page.
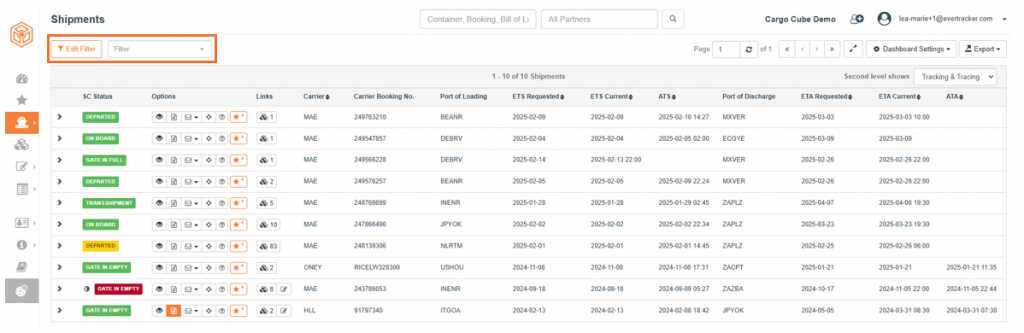
Proceed as follows to activate SC filters:
- Navigate to the overview page you want to filter.
- Click button „Edit Filter“. The filter dialog opens.
- Select a status type, for example, SC, a corresponding status, and an optional traffic light color in the body area of the dialog.
- Add a symbol and a color to your filter. You can do this in the footer area of the dialog.
- To make the filter available for the entire company, activate “Company wide Filter”. Otherwise, select “System Filter”. You can also find this configuration in the footer area of the dialog.
- To save the filter as a template, enter a template name and click “Save as Template”.
- Click Activate Filter to start filtering the overview page.

Time Filters
You can set up filters for times of departure, arrival, and delivery for Port of Loading, Port of Discharge, and Place of Delivery. You can set up absolute time and relative time filters.
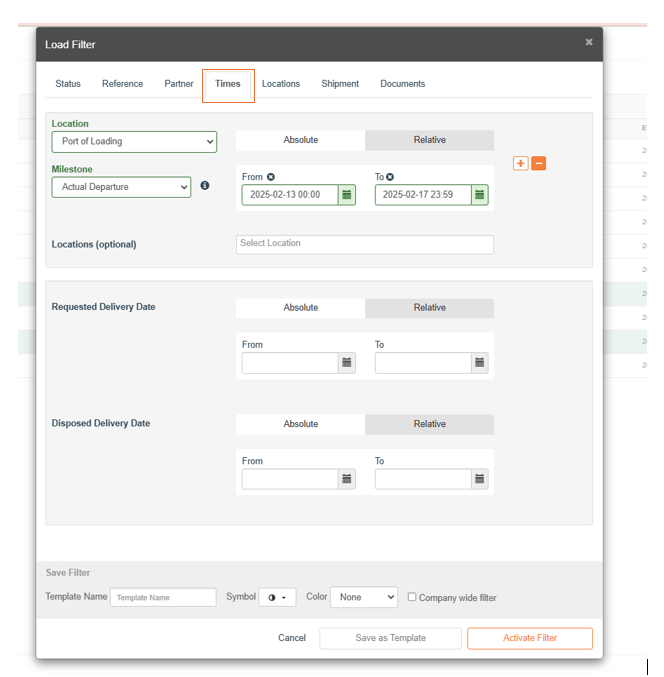
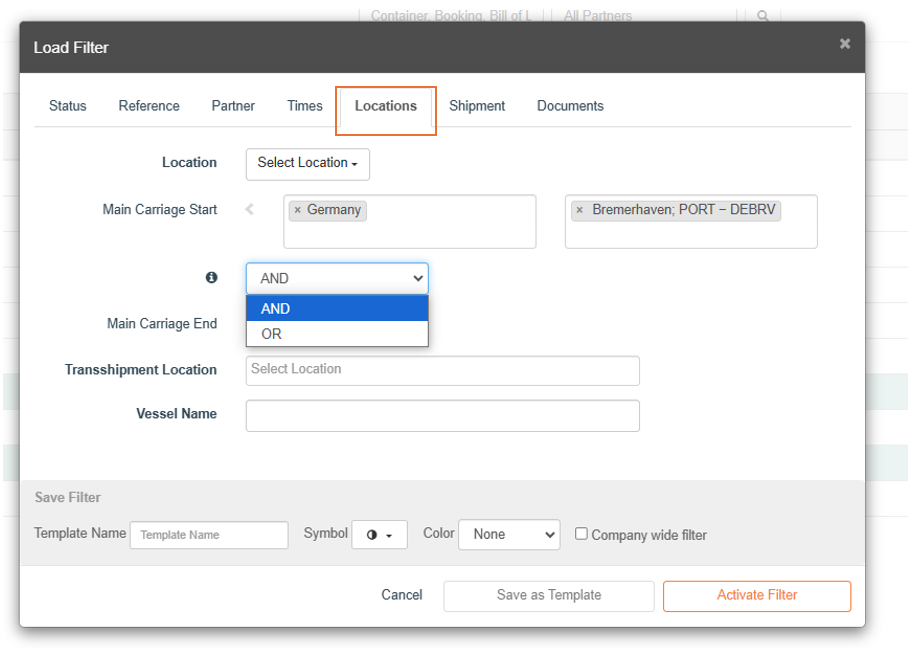
Location Filters
With the location-based filter, you can set up filters for a port of loading and port of discharge combination. You can combine the locations by using AND or OR options.
Widgets are quick filters, that allow you to quickly access filtered overview pages. You can configure your filter widgets according to your needs and place them on the dashboard.
Basis for a widget is a filter template, that is created using the filter module. To create a widget, proceed as follows:
- Go to User settings.
- Click on Dashboard” tab.
- Go to area „Configure Widget“.
- Choose the filter you want to use as filter widget.
- Activate the widget moving the slider within the „Desktop“ column to “On”.
- You can also activate widgets for your mobile app using the slider in the „Mobile“ Column.
- The entries can be moved via drag and drop to change the widget order on the dashboard.
Shipment Management (3)
Cargo Cube offers forms for our customers to provide either BL instructions or VGM data. These forms are easy to fill and give our customers the opportunity to send data directly to Cargo Cube systems in order to minimize error potentials and reduce e-mail traffic.
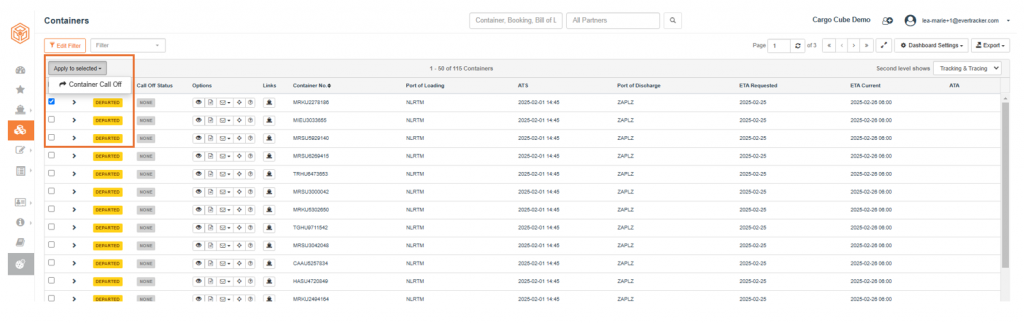
By calling off containers, you can manage the on-carriage of a shipment. Before you can execute a container call-off, the module must be activated by our Cargo Cube team. As soon as the module is available on the container overview page, you can call-off your containers with just a few clicks. Proceed as follows:
- Go to container overview page.
- Identify one or more containers and activate the corresponding checkboxes in the first column.
- Click „Apply to selected“ > Container Call Off on the top left of the table. In the next step , the Container Call Off form opens.
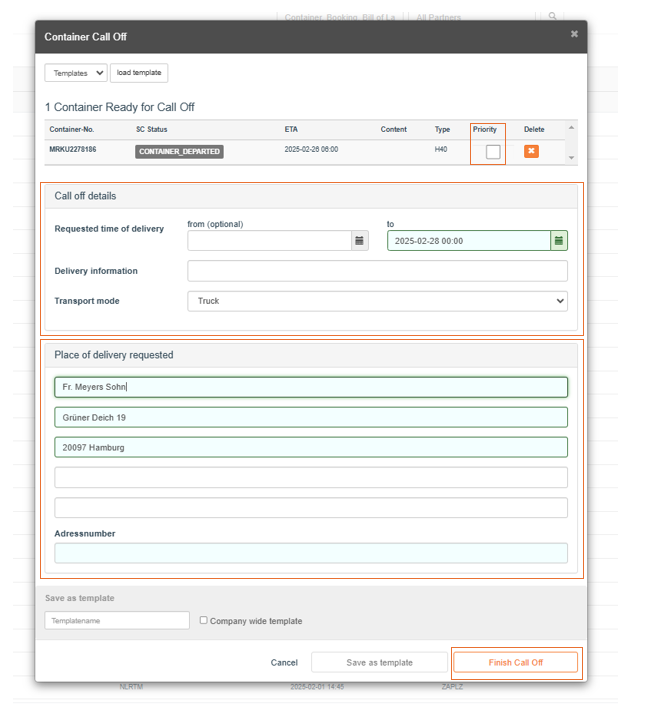
4. If you have selected several containers, define their priority by using the corresponding checkbox.
5. Enter the requested time of delivery and delivery information; select transport mode.
6. Provide delivery address.
7. Click Button „Finish Call Off“.
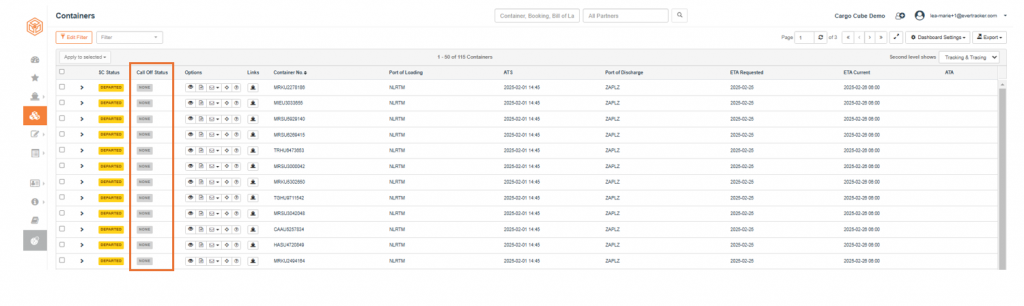
In the next step, Cargo Cube transfers the call-off to our operations. The call off status is visible in the „Call Off Status“ column.
Cruise Control offers the following modules for different tasks:
- Tracking and Tracing
- Partner Collaboration
- Order Management
- Control Tower
- E-Quotes
- Tracking & Tracing (T&T)
- Enables real-time monitoring of supply chain processes.
- Compares current and target data and records deviations (deviation management).
- Records the tracking and tracing status via EDI to ensure high data quality.
- Includes customizable dashboards (name, type, and order of columns).
- Partner Collaboration
- Serves as a workflow platform for all parties that are involved in the supply chain process.
- Offers document management:
– View, upload and send documents.
– Edit and verify documents. - Sends alerts: Set up customer-specific notifications in case of deviations so that the customer can react in a timely and appropriate manner.
- Order Management
- Offers efficient supplier monitoring.
- Check via the supplier monitoring process if an order is on time and complete.
- Keep the customer up-to-date about the order status.
- Monitors the supply chain before physical shipping.
- Offers integrated communication for better transparency, information density, and faster responsiveness.
- Control Tower
- Continously improves processes.
- Offers an integrative approach to control and optimize logistics processes.
- Provides information to measure the performance of logistics processes and involved partners.
- E-Quotes
- Simplifies the purchasing process of the customer.
- Offers price transparency for planned shipments.
Booking Request (1)
Yes, our platform offers both, cross-carrier sailing schedule informations as well as the option to get spot quotes.
Sailing Schedules
Cargo Cube provides the option to obtain comprehensive sailing schedules for specific trades. Sailing schedules can be searched by entering search criteria like time frame, POL, POD. The result is a matrix view showing all carriers serving the trade and the transit time of their service. This shall provide a profound idea how potential transports could be booked. The schedule data is updated daily and is received from a specialized service provider via interface.
Our sailing schedules feature needs be activated for your business partner. In case you want to use it, please contact our support team via: info@cargo-cube.com